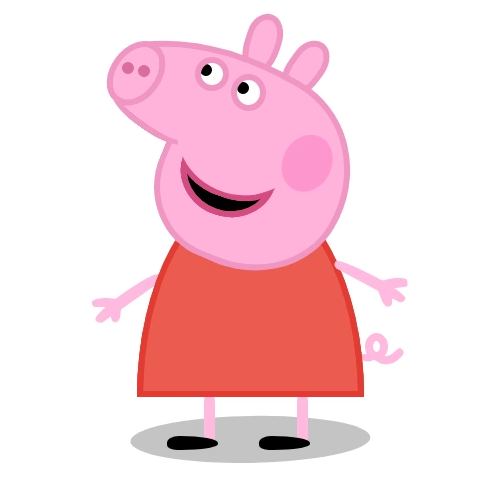
纯css构建的小猪佩奇。
今年是猪年,晚上抽空画了个小猪佩奇,只用了html和css。难度不是很大,但是具体画起来比较费工夫。写篇日志记录一下怎么画吧。
首先我们来分析一下小猪佩奇的结构。
 小猪佩奇比较容易实现的地方在于,它全身多数都是曲线或者抛物线。我们也可以用canvas画,但是也可以用纯css画。这里就涉及到了css3的一个特性——border-radius.在我画佩奇的时候,几乎全程都在使用这个属性。熟悉了它,小猪佩奇就好画了。
我们先了解一下这个border-radius的用法。
简单来说,这个border-radius最多支持8个值。其具体的用用法如下:
border-radius: 300px 300px 300px 300px/300px 300px 300px 300px;
其中的八个值分别是:
border-radius: 左上角水平圆角半径大小 右上角水平圆角半径大小 右下角水平圆角半径大小 左下角水平圆角半径大小/左上角垂直圆角半径大小 右上角垂直圆角半径大小 右下角垂直圆角半径大小 左下角垂直圆角半径大小;
其中,每个值可以使用的度量值都有:em,ex,pt,px,以及百分比等。 当border-radius设置1个值时,表示4个圆角都使用这个值,设置两个值,则表示左上/右下使用第一个值。右上和左下使用第二个值。如果设置四个值,则表示依次对应左上,右上,右下,左下的顺时针顺序。 举例:
我们首先来实现一个圆:
div { width: 100px; height: 100px; } p { width: 100%; height: 100%; background: lightgreen; border-radius: 50&; }

实现一个半圆:
p { width: 100%; height: 50%; background-color: lightgreen; border-top-left-radius: 50px; border-top-right-radius: 50px; }

好了,了解了这些我们就可以开始画小猪佩奇了!
其中佩奇有几个可以参考的值如下图:
 在画的时候,我把佩奇分成了三个部分。分别是猪头,躯干和下肢。比较难画的是猪头。其中在脸部的时候,我分别先画了猪鼻和脸,然后将两块拼接以后在画鼻子和嘴等小部件。
猪头部分代码实例:
.nose {
        width: 255px;
        height: 97px;
        transform: rotate(20deg);
        background-color: #ffb3da;
        border: 6px solid #ec98c2;
        border-radius: 100% 77% 87% 59% ~'/' 108% 100% 100% 80%;
        > div {
          width: 42px;
          height: 60px;
          background-color: #ffb3da;
          border: 6px solid #ec98c2;
          transform: rotate(20deg);
          border-radius: 100% 100% 100% 100% ~'/' 100% 100% 100% 100%;
          position: relative;
          top: 15px;
          left: -6px;
          > div {
            transform: rotate(-21deg);
            > div {
              width: 12px;
              height: 12px;
              background-color: #db6d9b;
              border-radius: 100%;
              display: inline-block;
              position: relative;
              top: 14px;
              left: -1px;
            }
          }
        }
      }
            .face {
        width: 184px;
        height: 162px;
        transform: rotate(14deg);
        background-color: #ffb3da;
        border: 6px solid #ec98c2;
        border-radius: 22% 31% 80% 72% ~'/' 79% 74% 100% 105%;
        position: relative;
        top: -67px;
        left: 61px;
        .shadow {
          width: 175px;
          height: 92px;
          background-color: #ffb3da;
          position: relative;
          top: -17px;
          left: -6px;
          border-radius: 53% 62% 123% 50%;
        }
        .eye {
          position: relative;
          left: 4px;
          top: -111px;
          transform: rotate(7deg);
          > div {
            width: 28px;
            height: 28px;
            background-color: #ffffff;
            border: 6px solid #ec98c2;
            border-radius: 100%;
            display: inline-block;
            overflow: hidden;
            > div {
              width: 12px;
              height: 12px;
              background-color: #000000;
              border-radius: 100%;
              position: relative;
              left: -1px;
              top: 8px;
            }
          }
        }
        .blush {
          width: 49px;
          height: 60px;
          background-color: #fe96ce;
          transform: rotate(18deg);
          border-radius: 100%;
          position: relative;
          top: -119px;
          left: 118px;
        }
        .mouse {
          position: relative;
          top: -105px;
          left: 17px;
          > div {
            &:nth-child(1) {
              width: 92px;
              height: 27px;
              background-color: black;
              border: 6px solid #d44c80;
              border-radius: 0 0 60% 60% ~'/' 0 0 100% 100%;
            }
            &:nth-child(2) {
              width: 92px;
              height: 13px;
              background-color: #ffb3da;
              border: 6px solid #d44c80;
              border-radius: 0 0 123% 124% ~'/' 0 0 200% 200%;
              position: relative;
              top: -40px;
              left: 0px;
              border-top: none;
            }
          }
        }
      }
其他的部分也按照这个思路写就可以了。最后我就可以收获一只小猪配齐了!

转载请注明出处。
